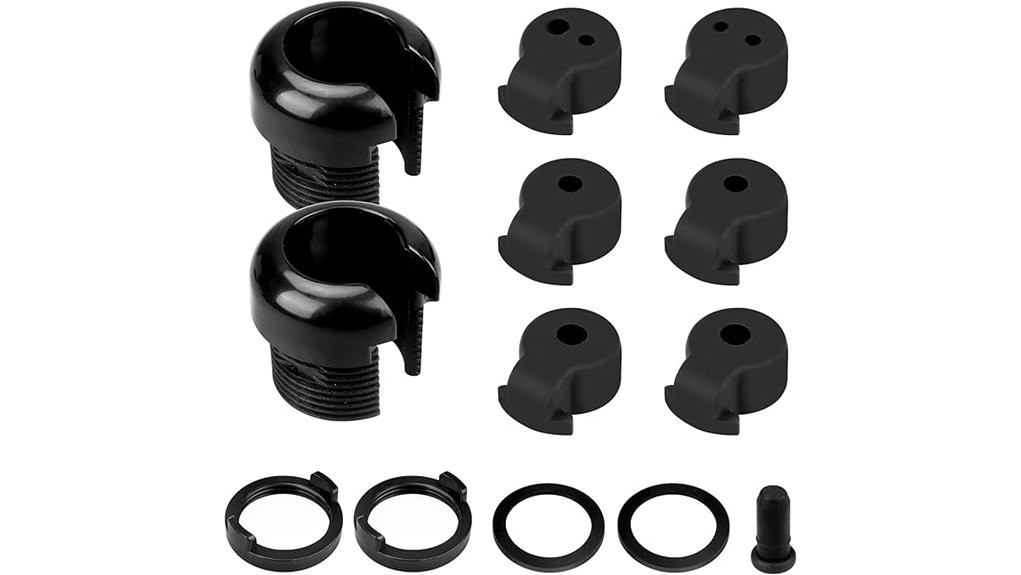
You’ll get a compact, watertight pass‑through that routes small electronics through a 1‑3/8″ hull hole and seals cables with six interchangeable fittings (1/8″–5/16″). It clamps hulls up to 1/2″ thick, suits fishfinders, lights, transducers and removable pods, and uses marine‑grade materials. Installation needs careful drilling, sealant, and fitting selection; inspect seals and threads for wear in saltwater. It’s a practical, limited‑diameter solution—keep going to see detailed fit, install and alternatives.
Some Key Takeaways
- Accepts six interchangeable grommets for cable diameters 1/8″–5/16″, covering most small kayak electronics leads.
- Requires a 1-3/8″ hole and clamps hulls up to 1/2″ thick, so verify hull thickness and clearance.
- Provides a watertight flange with locking nut and marine-grade materials, but inspect seals and threads regularly.
- Ideal for fishfinders, transducers, lights, and removable pods; not suitable for large power cables or heavy-duty thru-hulls.
- Installation is reversible and straightforward with drill, sealant, and proper cable measurement, but control bit exit and secure kayak while drilling.
What the Through-Hull Wiring Kit for Kayaks Actually Does
Think of the through-hull wiring kit as a tidy, waterproof pass-through that lets you route cables from deck-mounted devices into the kayak’s interior without creating snags or clutter. You’ll install a sealed flange through a 1-3/8-inch hull aperture, insert the appropriate grommet for cable diameter, and tighten the locking nut to compress the seal. The kit centralizes cable management, hides conductors, and preserves hull integrity while maintaining water resistance. By minimizing exposed lines and trip hazards, you’ll improve marine safety and reduce wear on connectors. Installation is reversible and accommodates common kayak electronics with durable, marine-grade materials. It’s an excellent addition for paddlers who prioritize organized, safer deck line setups and long-term gear protection.
Who This Kit Fits: Cable Sizes, Hull Thickness, and Pod Compatibility
While you install electronics, this through-hull kit accommodates a wide range of setups: it accepts cable diameters from 1/8” to 5/16″ via six interchangeable fittings, requires a 1-3/8″ hole, and clamps to hulls up to 1/2″ thick. You’ll fit fishfinder, transducer, light and power leads without bulk, improving kayak ergonomics by routing cables neatly. The multiple fittings support tidy wire management and simplify pod maintenance for removable pods like dry or flex styles. Materials meet common electrical regulations for marine use, but you should verify local codes and inspect seals periodically for water integrity. For safer outings, consider pairing this kit with other essential gear for kayak adventures, such as an electric bilge pump and safety equipment essential gear.
Step-by-Step Install Guide: Drilling, Fitting Sizes, and Sealing Tips
Before you drill, confirm cable diameters and hull thickness so you choose the correct insert and avoid rework: measure each cable with calipers, pick the matching fitting from the six supplied (1/8″–5/16″), and verify your hull is ≤1/2″ thick and clear of internal obstructions where the 1-3/8″ hole will be cut. Mark location, use an alignment jig or center punch, then drill pilot and final holes with sharp bits. Practice drill safety: secure the kayak, wear eye protection, and control bit exit. Fit the selected insert, apply marine-grade sealant using recommended sealant selection, tighten, and complete wire labeling. Consider also consulting kayak hoist compatibility guidelines to ensure your ceiling hoist and kayak setup work together safely.
Real-World Performance: Durability, Water Resistance, and Common Use Cases
Because you’ll expose the through-hull wiring kit to repeated moisture, vibration, and UV, assess its durability by checking the marine-grade plastic for stress cracks and the fittings for thread wear after several outings. You’ll inspect seals for water ingress, monitor for marine wear at contact points, and subject assemblies to UV testing protocol informally by noting discoloration and embrittlement. Evaluate corrosion resistance of metal inserts and threads under salt exposure. Track performance through load cycles: insert/remove cables, flex, and vibrate the hull-mounted fittings. Typical use cases: fishfinder/transducer runs, lighting and battery leads, and removable pod cable management. Also consider compatibility with other kayak accessories like deck-mount pumps and storage pods to ensure seamless integration with your essential gear.
Should You Buy It? Pros, Cons, and Best Alternatives
Having inspected durability, water resistance, and wear under real-world conditions, you can now weigh whether this through-hull wiring kit meets your needs. You’ll appreciate its marine-grade plastic, six fitting sizes (1/8″–5/16″), and clean cable routing for electronics. Pros: compact, watertight fittings, broad compatibility with pods and hulls up to 1/2″ thick. Cons: requires a 1-3/8″ hole, limited to small-diameter cables, basic aesthetics. Check price comparison and user testimonials before buying; they reveal value vs. branded alternatives. Alternatives: sealed bulkhead connectors or higher-end bronze thru-hulls for heavy-duty installations. Choose by application and budget. Gear up for water adventures with kayaks and perimeter kits to ensure your electronics and hull fittings match your paddling setup.
Some Questions Answered
Can This Kit Be Used on Inflatable Kayaks?
Yes — you can use it on inflatable kayaks with caution. You’ll check inflation compatibility first: the kit needs a 1-3/8″ hole and hull thickness up to 1/2“, so you’ll reinforce the area beneath the skin. You’ll maintain valve access by locating fittings away from inflation valves and seams. Use backing plates or rigid patches to prevent tears, guarantee water-resistant seals, and test for leaks before final use.
Are Replacement Seals Available Separately?
Yes — replacement seals are available. You’ll find OEM and aftermarket sources offering compatible O-rings and gaskets sized for the kit’s fittings; check Ophjerg support first for exact part numbers. If OEM parts aren’t listed, search aftermarket sources (marine hardware suppliers, kayak parts retailers) using the fitting sizes (1/8″–5/16″) and hull hole spec. Keep originals for reference to make certain material and thickness match water-resistant requirements.
Does Color Match Other Kayak Hardware?
Yes — the kit’s black finish lets you achieve good color coordination with most kayak hardware finishes. You’ll find the marine-grade plastic black matches common black, dark gray, and matte hardware, minimizing contrast. If your boat uses bright or polished fittings, the kit won’t perfectly match those chrome or anodized surfaces, but it remains visually neutral. You can paint or add trim for exact matching if needed.
Is It Compatible With Powered Trolling Motors?
Yes — you can use it with powered trolling motors. It accepts motor wiring and battery placement runs, keeping cables tidy through the hull. The kit fits cables from 1/8″ to 5/16″, requires a 1-3/8″ hole, and handles hulls up to 1/2″ thick. Use the water-resistant fittings for waterproof motor wiring passages and route battery placement leads to avoid chafing. Contact the seller for heavy-gauge power cable guidance.
What Is the Warranty Period?
The product listing doesn’t state a specific warranty period, so you won’t find a manufacturer warranty length there. For questions about battery longevity impact or installation complexity, contact the seller directly; they aim for satisfaction and can confirm any warranty, service options, and how proper installation affects battery longevity and overall reliability. Keep documentation and photos of your install to support any claim.